
Introduction: The Precision Art of GPU Cooling Block Machining
In the high-stakes world of PC performance, where every frame and megahertz counts, the battle against heat is relentless. At the heart of this thermal war lies a component of remarkable engineering: the GPU cooling block. More than just a hunk of metal, it is a meticulously crafted micro-engineering marvel, its performance dictated by the exacting science of its creation. The process of gpu cooling block machining is not merely a manufacturing step; it is the foundational art that transforms raw materials into the primary interface between a blazing-hot graphics processor and the cooling liquid that tames it. This precision art balances fluid dynamics, thermal conductivity, and mechanical integrity, demanding tolerances measured in microns. The journey from a solid block of copper or aluminum to a complex labyrinth of channels and fins is a testament to advanced manufacturing, where the quality of the cut directly translates to the silence, stability, and overclocking headroom of a high-end gaming rig or workstation.
What is a GPU Cooling Block? Anatomy and Core Function
A GPU cooling block, often called a water block in custom liquid cooling loops, is a direct-contact heat exchanger. Its core function is to capture waste thermal energy from the graphics processing unit (GPU) die, as well as associated components like VRAM and VRMs, and transfer it efficiently into a flowing coolant. Unlike bulky air coolers, it achieves this through intimate metal-to-metal contact and optimized liquid flow paths.
Anatomically, a typical full-cover GPU block consists of several key layers:
- Cold Plate: This is the heart of the block. It’s a flat, machined metal plate that sits directly on the GPU chip. Its underside features a precisely machined array of micro-fins, pins, or channels that create a vast surface area for heat transfer to the coolant.
- Jet Impingement or Distribution Plate: Often integrated into the cold plate design or as a separate layer, this component manages the coolant flow. It uses a series of inlets and micro-nozzles to forcefully direct coolant onto the hottest areas of the cold plate, breaking up boundary layers and maximizing thermal exchange.
- Main Housing or Top Plate: This structural component seals the cooling chamber. It contains the inlet and outlet ports for the coolant tubing and often features aesthetic elements like acrylic windows or intricate CNC-milled designs. It must be rigid enough to withstand clamping pressure and internal fluid pressure without deforming.
- Mounting Hardware and Thermal Interface: A system of screws, backplates, and standoffs ensures even, secure mounting pressure. Between the cold plate and GPU die, a high-performance thermal paste or pad is applied to fill microscopic imperfections and ensure optimal thermal conduction.
In essence, the block is a sealed, pressurized micro-channel system where coolant is forced to absorb heat as rapidly as possible before being carried away to a radiator. The efficiency of this entire system is born in the machining process.
The Critical Role of Machining in Liquid Cooling Performance
The performance gap between an average and an exceptional liquid cooling solution is almost entirely forged during machining. This stage determines the fundamental physical properties that govern thermal and hydraulic performance. Three machining-dependent factors are paramount: surface flatness, channel geometry, and seal integrity.
First, the flatness of the cold plate’s contact surface is non-negotiable. A GPU die is typically only a few hundred square millimeters in area. Any microscopic warping or unevenness in the cold plate creates air gaps, which are terrible thermal insulators. High-precision machining and subsequent lapping ensure a near-perfectly flat surface, allowing the thermal interface material to form a thin, consistent layer for unimpeded heat transfer.
Second, the geometry of the internal cooling structures—the fins, pins, and channels—is a direct product of machining capability. The density, height, and thickness of these features define the block’s thermal performance and flow resistance. Finer, denser micro-fins offer more surface area for heat exchange but restrict coolant flow, requiring more pump pressure. The machining process must carve these delicate features with sharp, clean edges and consistent dimensions; burrs or variations can create flow dead spots, increase pressure drop, and trap air bubbles, severely hampering efficiency.
Finally, machining defines the sealing surfaces. The mating faces between the cold plate, O-ring grooves, and top plate must be flawlessly smooth and parallel. Any imperfection here can lead to leaks, which are catastrophic in a PC. The precision of the O-ring channel’s depth and width ensures the silicone seal compresses correctly, creating a reliable, long-lasting barrier against high-pressure coolant. In short, machining transforms a theoretical design into a physical object that must excel in thermal conduction, fluid dynamics, and mechanical reliability simultaneously.
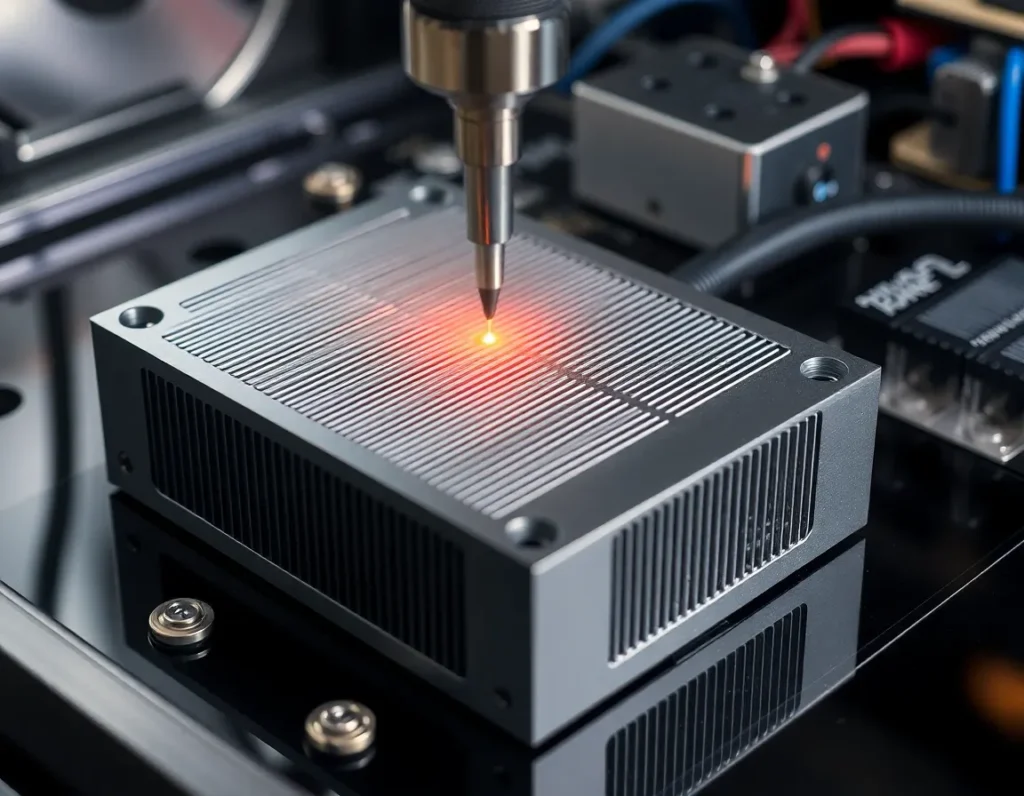
Primary Machining Processes: CNC Milling, Drilling, and Finishing
The creation of a GPU cooling block is dominated by Computer Numerical Control (CNC) machining, a subtractive manufacturing process where pre-programmed software dictates the movement of factory tools and machinery. This allows for the extreme precision and repeatability required.
CNC Milling
CNC milling is the workhorse process. A block of metal (the “workpiece”) is fixed to a moving bed, and a rotating multi-point cutting tool removes material. For GPU blocks, this happens in multiple stages and axes. 3-axis milling is common for simpler geometries, but 5-axis milling is often employed for complex, full-cover blocks with integrated channels and mounting points on multiple planes. The milling process creates the O-ring grooves, port threads, mounting screw holes, the main coolant cavity, and the external aesthetic features. The most critical milling operation is the creation of the micro-fin array on the cold plate. This requires specialized micro-tools, often smaller than 1mm in diameter, moving at high speeds with minimal vibration to prevent tool breakage and ensure dimensional accuracy.
CNC Drilling
While milling uses rotary cutters, drilling creates round holes. In block manufacturing, CNC drilling is precisely used for the inlet and outlet ports that connect to the coolant tubes. These holes must be perfectly perpendicular and smoothly finished to ensure a good seal with fittings. Deep drilling may also be used to create internal vertical passages in multi-layer block designs for coolant distribution.
Finishing Processes
After the primary metal is removed, several finishing steps are crucial:
- Deburring: Manual or automated removal of tiny raised edges or “burrs” left by cutting tools, especially critical inside fluid channels to ensure smooth laminar flow.
- Lapping/Sanding: The GPU contact surface is often hand-lapped or machine-sanded on a perfectly flat plate with progressively finer abrasives. This achieves the mirror-flat finish necessary for optimal thermal contact.
- Cleaning: Intensive ultrasonic cleaning in specialized solutions removes all machining oil, metal dust, and abrasive particles from the intricate internal channels. Any residue would contaminate the coolant and degrade performance.
- Surface Plating (if applicable): For blocks using nickel-plated copper, the machined copper component undergoes an electrochemical plating process to apply a layer of nickel for corrosion resistance and aesthetics, before a final cleaning.
This symphony of CNC-controlled and manual finishing processes ensures the block is not just shaped correctly, but is hydraulically smooth, thermally optimal, and impeccably clean.
Material Selection for GPU Cooling Blocks: Copper, Nickel, and Aluminum
The choice of material is a fundamental engineering decision in gpu cooling block machining, directly trading off between thermal performance, corrosion resistance, weight, cost, and manufacturability.
Copper (Cu)
Copper is the undisputed king of thermal performance for cooling blocks. With a thermal conductivity of approximately 385-400 W/(m·K), it transfers heat from the GPU die to the coolant more effectively than any other practical metal. It is also relatively easy to machine, allowing for the creation of sharp, fine micro-fins. Nearly all high-performance blocks use a copper cold plate. Its primary drawbacks are its propensity to oxidize (develop a patina) and its susceptibility to galvanic corrosion if paired with aluminum in the same loop without proper inhibitors. It is also dense and expensive.
Nickel (Ni) – Almost Always a Plating
Pure nickel blocks are exceedingly rare due to cost and machining difficulty. Instead, nickel is used as an electroplated surface layer over a copper substrate. Nickel plating, typically 5-15 microns thick, serves two main purposes: corrosion resistance and aesthetics. It forms a hard, stable barrier that protects the underlying copper from oxidation and galvanic corrosion. It also provides the signature shiny, silver finish favored by many enthusiasts. The plating must be applied evenly and adhere perfectly; any porosity or flaking can expose the copper and lead to localized corrosion. While nickel has lower thermal conductivity (~90 W/(m·K)) than copper, the layer is so thin that its impact on overall thermal resistance is minimal.
Aluminum (Al)
Aluminum, with a thermal conductivity around 160-200 W/(m·K), is a distant second to copper in pure thermal performance. However, it is significantly lighter, cheaper, and easier to mass-produce through casting and machining. Its use is almost exclusively in all-in-one (AIO) liquid coolers and entry-level cooling solutions where cost and weight are primary constraints. A critical rule in liquid cooling is to never mix aluminum and copper components in the same loop without specialized coolant, as the difference in electrochemical potential will cause rapid galvanic corrosion, clogging fins and destroying blocks.
The material selection directly influences the machining strategy. Softer copper allows for more aggressive cuts and finer details but requires care to avoid gouging. Aluminum machines quickly and cleanly but can be gummy, requiring sharp tools and specific feed rates. The chosen material ultimately sets the ceiling for the block’s potential thermal efficiency, which the machining process then strives to fully realize.
Advanced Techniques: Micro-Fin Structures and Jet Impingement Plates
Pushing beyond the foundational milling and drilling of a basic cold plate and channels lies the realm of advanced gpu cooling block machining. Here, the precision of modern CNC technology is leveraged not just to create a path for coolant, but to engineer microscopic turbulence and direct, high-velocity fluid impacts that dramatically enhance heat extraction. Two techniques stand at the forefront of high-performance cooling: micro-fin arrays and jet impingement plates.
Micro-Fin Arrays
Imagine replacing the smooth floor of a coolant channel with a dense forest of microscopic fins. This is the principle behind micro-fin arrays. Using specialized micro-tools, often with diameters between 0.2mm and 0.5mm, CNC machines carve hundreds of these tiny fins directly into the copper or nickel-plated copper cold plate. The purpose is multifaceted. First, they drastically increase the surface area in direct contact with the coolant, providing more “skin” for heat to transfer into the fluid. Second, and more critically, they disrupt laminar flow—the smooth, layered movement of liquid that is poor for heat transfer. The fins force the coolant into a turbulent state, constantly mixing the hotter fluid near the metal with the cooler fluid in the center of the channel. This turbulence ensures the coolant’s thermal capacity is fully utilized before it exits the block. Machining these fins requires exceptionally rigid machines, high spindle speeds, and sophisticated toolpath strategies to prevent tool deflection and breakage, representing a pinnacle of precision manufacturing in cooling solutions.
Jet Impingement
While micro-fins work on creating turbulence across a wide area, jet impingement is a technique of targeted, aggressive cooling. In this design, the cooling block incorporates a secondary plate (the jet plate) positioned between the inlet and the cold plate. This jet plate is machined with an array of precise, small-diameter holes. As pressurized coolant is forced through these holes, it transforms into multiple high-speed jets that shoot directly onto the hottest zones of the cold plate—typically the areas aligned with the GPU die’s cores. This violent impact scrubs away the insulating boundary layer of hotter fluid that naturally clings to the metal surface, achieving some of the highest possible heat transfer coefficients in liquid cooling. The spent fluid then flows sideways into surrounding micro-fin channels for further heat dissipation before exiting. Machining the jet plate requires extreme accuracy in hole diameter, spacing, and alignment to ensure even coverage and optimal pressure distribution across the entire GPU die.
The implementation of these advanced features is a direct response to the concentrated heat flux of modern GPUs. By combining micro-fins for broad-area efficiency with jet impingement for spot-cooling intensity, block manufacturers can design solutions that keep pace with thermal design power (TDP) figures exceeding 500 watts. The transition from simple channels to these engineered structures marks the difference between a cooling block that merely works and one that defines the cutting edge of thermal performance.
Quality Control and Testing: Ensuring Flatness, Leak-Proof Seals, and Thermal Efficiency
The most intricately machined cooling block is a failure if it leaks, doesn’t make proper contact, or performs poorly. Therefore, rigorous quality control and testing protocols are integral to the manufacturing process, acting as the final gatekeeper before a block reaches a customer’s high-end PC.
Dimensional and Surface Flatness Verification
The flatness of the cold plate is non-negotiable. Even a microscopic convex or concave bow can create air gaps between the block and the GPU die, crippling thermal transfer. After machining, blocks undergo precise flatness testing using tools like dial indicators on surface plates or, more commonly, optical flatness scanners. These scanners use light interference patterns to create a topographical map of the surface, measuring deviations down to microns (µm). A typical high-performance block specification demands flatness within 0.05mm or less across the entire IHS contact area. Any block outside this tolerance is re-lapped (precision sanded flat) or scrapped.
Leak Testing Under Pressure
Every single cooling block must be validated as leak-proof. This is not a simple visual check. Blocks are subjected to pressure decay testing. The block’s ports are sealed, and it is pressurized with air or an inert gas to a level significantly higher than normal loop operating pressure (e.g., 1.5 to 2 bar). The system then monitors for any pressure drop over a set period. A drop indicates a leak, often from an imperfect O-ring groove, a micro-crack from machining stress, or a faulty seal in a threaded fitting. Blocks that pass are clean and dry; those that fail are diagnosed and repaired if possible.
Thermal Performance Benchmarking
While dimensional checks ensure the block can be installed, thermal testing proves it works. Manufacturers use standardized test benches to quantify performance. A thermal test head (simulating a GPU die) generates a known, controlled amount of heat. The block is mounted with a standardized thermal paste and torque, and coolant at a set temperature and flow rate is passed through it. Sensors measure the temperature difference between the coolant (∆T) and the heat source. This data is used to calculate thermal resistance (in °C/W)—the ultimate metric of a block’s efficiency. Lower resistance means better performance. This testing validates design choices, machining quality of micro-features, and ensures consistency from batch to batch. It’s the final, definitive proof that the machining and assembly processes have come together to create a product that performs as engineered.
Custom vs. Mass-Produced: Machining for Enthusiasts and OEMs
The world of GPU water blocks splits into two distinct paradigms, each with its own machining philosophy, scale, and economic drivers: mass production for original equipment manufacturers (OEMs) and the custom market for PC enthusiasts.
Mass-Produced OEM Blocks
This domain is defined by scale, cost-efficiency, and reliability for a broad market. Think of the cooling solutions pre-installed on liquid-cooled graphics cards from major brands or standard all-in-one (AIO) coolers. Here, machining is highly optimized for volume. Processes often involve casting the main block body from aluminum (for AIOs) or copper, then using high-speed CNC machining centers in automated production lines to finish critical surfaces, drill ports, and mill channel patterns. Tolerances are tight but focused on repeatability over absolute perfection. The design is usually simplified for manufacturability—wider channels, fewer ultra-fine micro-fins—to maximize yield and minimize machining time. The primary goal is to produce thousands of identical, reliable units at a low cost per unit, meeting a guaranteed performance standard for the OEM’s product.
Custom and Enthusiast-Grade Blocks
At the opposite end of the spectrum lies the custom market, catering to the modding and extreme performance community. Here, the focus shifts from cost to ultimate performance, aesthetics, and compatibility with specific, often rare, graphics card models. Machining is done in smaller batches or even as one-off commissions. Manufacturers like EKWB, Watercool, and Bitspower use full CNC machining from solid copper or brass billets, even for complex shapes, avoiding casting entirely for superior material integrity and detail. This allows for daring designs: intricate, deep micro-fin arrays, integrated RGB light channels, and acrylic tops with elaborate milled logos. Tolerances are obsessive, and finishing processes like meticulous hand-polishing or multi-layer nickel plating are common. The machining runs are slower, the material waste is higher, and the cost reflects it. This sector thrives on innovation, quickly adapting to new GPU releases and pushing the boundaries of what’s possible in gpu cooling block machining for those who view cooling as a centerpiece of their build.
The dichotomy ensures that liquid cooling remains accessible at an entry level while providing a pinnacle to aspire to for enthusiasts. Both sectors rely on precision machining, but they apply its capabilities to solve fundamentally different business and engineering challenges.
Summary of Key Points
GPU cooling block machining is a sophisticated discipline that transforms raw metal into a critical thermal management component. It begins with selecting the right material—copper for its unmatched conductivity, often nickel-plated for corrosion resistance, or aluminum for cost-sensitive applications, with careful avoidance of galvanic corrosion. The core processes of CNC milling, drilling, and finishing create the fundamental structure: the cold plate for die contact and the channels for coolant flow.
Advanced techniques elevate performance. Micro-fin arrays, machined with tiny tools, create turbulent flow and massive surface area for efficient heat transfer. Jet impingement plates use precisely drilled holes to blast coolant directly onto hot spots, disrupting the thermal boundary layer for maximum cooling intensity. These features are direct responses to the extreme heat flux of modern graphics processors.
None of this precision matters without rigorous quality control. Every block must pass stringent tests for cold plate flatness (within hundredths of a millimeter), undergo pressurized leak testing, and be thermally benchmarked to verify its performance against a calculated thermal resistance metric. This ensures reliability and efficacy.
Finally, the machining approach diverges based on the market. Mass-produced blocks for OEMs prioritize high-volume, cost-effective manufacturing with reliable performance. In contrast, the custom enthusiast market employs full-CNC machining from solid billets to achieve peak thermal performance, intricate aesthetics, and support for niche hardware, representing the artisanal peak of the craft. Together, these facets of machining make liquid cooling a viable and high-performance solution for GPUs at every level of the computing world.
Frequently Asked Questions (FAQ)
What is the single most important factor in GPU block performance?
While material and design are crucial, the quality of the contact between the block’s cold plate and the GPU die is paramount. This is determined by the machining flatness of the plate and the mounting pressure. Even the best copper block with micro-fins will underperform if the surface isn’t perfectly flat, creating insulating air gaps. This is why premium blocks undergo such rigorous flatness verification.
Can I machine my own custom GPU water block?
Technically yes, but it is an exceptionally challenging project requiring advanced machining skills and equipment. You need a capable CNC mill, micro-tools for fin structures, precise CAD/CAM programming, and the ability to perform leak and pressure testing. For most, purchasing a professionally machined block designed for their specific GPU model is far more practical, reliable, and cost-effective.
Why are some blocks made from a single piece of metal (monoblock) for the GPU and VRM, while others are separate?
This is a design and machining choice. A monoblock cools the GPU, VRM (voltage regulation modules), and sometimes memory with one unit, offering a clean aesthetic and simplified loop. However, it is larger, more complex to machine, and specific to one graphics card model. Separate blocks offer modularity and may allow for more focused cooling on the GPU die itself, but require more fittings and tubing. Machining a monoblock involves a more complex, multi-level milling operation to create different channel depths for various components.
How does nickel plating affect performance and machining?
Nickel plating is applied electrochemically after the copper block is machined. It adds a thin, protective layer that prevents copper oxidation (tarnishing) and improves compatibility with coolants and other loop metals. The plating slightly reduces thermal conductivity compared to bare copper, as nickel is less conductive, but the difference in a thin layer is minimal (1-3°C typically). The machining itself is done on the copper substrate, as plating would be destroyed by cutting tools.
Is a block with more, finer coolant channels always better?
Not necessarily. While dense micro-fins increase surface area, they also increase flow restriction (pressure drop). Your pump must be strong enough to overcome this restriction and maintain adequate flow rate through the entire loop. A balance must be struck. A block with extreme fin density might outperform on a test bench with a powerful standalone pump, but could cause overall loop failure in a system with a weaker pump. Good block design optimizes for heat transfer and manageable flow restriction.
How long does it take to machine a single high-end GPU water block?
For a custom, enthusiast-grade block machined from a solid copper billet, the total CNC machining time can range from 45 minutes to over 2 hours per block, depending on the complexity of the fin structure, top design, and logos. This doesn’t include time for plating, polishing, cleaning, assembly, and testing. Mass-produced blocks have cycle times measured in minutes due to optimized toolpaths and often starting from pre-cast near-net shapes.